
Installing Fedora 23 on the Pi2 or 3 is pretty reasonable with a little effort and worth the trouble. A real distro may not be exactly snappy on the Pi3 but the advantage of a familiar environment with a real browser makes up for a little slowness. Something to note, activating WiFi is not included here, so have a wired connection please.
If you came in from Redit or StackExchange or similar, please upvote my posting there so that others will see this page too.
 I’m going to assume you have the ability to write a Raspberry image to SD card with some confidence, to issue basic commands in a terminal session and that you have root access on a Linux machine to work with. My apologies to those with more skills but I’m targeting as wide an audience as possible. These instructions were tested using copy and paste from each of the code blocks below. If you’re unable to copy and paste, please pay careful attention to word-wrap because some of the lines are rather long.
I started with Jon Archer’s directions along with the steps in the comments plus a missing instruction that was critical to my install; with his directions the USB mouse and keyboard don’t work until you upgrade the Pi’s firmware images. Here I avoid the issue by downloading the firmware .zip file rather than cloning the firmware repository.
Download your interface of choice from http://mirrors.oit.uci.edu/fedora/linux/releases/23/Images/armhfp/
In my case, I used Mate in hopes of a reasonable trade off between resources and capabilities. My choice would be:
wget http://mirrors.oit.uci.edu/fedora/linux/releases/23/Images/armhfp/Fedora-Mate-armhfp-23-10-sda.raw.xz
Download errors happen so before wasting a ton of time on a bad image, compare the checksum in http://mirrors.oit.uci.edu/fedora/linux/releases/23/Images/armhfp/Fedora-Images-armhfp-23-CHECKSUM to the output of:
sha256sum Fedora-Images-armhfp-23-CHECKSUM
The mirrors I used were all throttled and the only torrent I found had only 2 seeders, so I recommend doing the following download in parallel in an additional terminal session:
wget -O ~/Downloads/master.zip https://github.com/raspberrypi/firmware/archive/master.zip
 Before issuing the commands below, make sure you know exactly where your sdcard is and that your device options match the device. A good way to find it is to insert the card and run:
dmesg | tail
Some likely names include /dev/sda, /dev/sdb, and /dev/mmcblk0.
I didn’t have a desktop with Windows, IOS or Linux, just the Pi2 running Raspbian, so I used a SD to USB adapter which appears as /dev/sda. Make sure all the partitions on your SD card are not mounted and unmount them if needed. Mine had one partition auto-mounted so I unmounted that with the following command:
umount /dev/sda1
This command, like just about everything below, requires root.
The next step was to copy the image to SD with the following command (again edit the version number if needed):
xzcat Fedora-Mate-armhfp-23-10-sda.raw.xz |dd of=/dev/sda bs=1M;sync
The image write took 16 minutes for me, so this might be a good time to get a fresh cup of coffee.
Change the partition type of partition 1 from 0x83 to 0x0B and expand the root partition to fill the disk with your preferred tools or with something like:
echo -e "p\nt\n1\nb\nd\n3\nn\np\n3\n`fdisk -l /dev/sda|tail -1|tr -s ' '|cut -d' ' -f2`\n\np\nw\n"|fdisk /dev/sda; sync; partprobe
Replace the ext3 filesystem with a fat32 one using:
mkfs.vfat /dev/sda1
Expand the root partition to fill the disk with:
e2fsck -f /dev/sda3

resize2fs /dev/sda3
Mount the partitions with:
mkdir /mnt/sdcard

mount /dev/sda3 /mnt/sdcard

mount /dev/sda1 /mnt/sdcard/boot
Extract the boot and module files from the raspberry firmware archive downloaded earlier:
unzip ~/Downloads/master.zip firmware-master/boot/* -d /mnt/sdcard/boot/

mv /mnt/sdcard/boot/firmware-master/boot/* /mnt/sdcard/boot/

rm -rf /mnt/sdcard/boot/firmware-master

unzip ~/Downloads/master.zip firmware-master/modules/*-v7+/* -d /mnt/sdcard/lib/

mv /mnt/sdcard/lib/firmware-master/modules/*-v7+/ /mnt/sdcard/lib/modules/

rm -rf /mnt/sdcard/lib/firmware-master/
Edit /mnt/sdcard/etc/fstab, setting the boot partition type to vfat and replacing the UUID of the boot partition with the UUID from:
blkid -s UUID /dev/sda1
Note, vfat UUIDs really are much shorter. It will be 8 hex digits with a dash in the middle.
Create the cmdline.txt file with:
echo "dwc_otg.lpm_enable=0 console=ttyAMA0,115200 console=tty1 \

root=/dev/mmcblk0p3 rootfstype=ext4 elevator=deadline rootwait"\

>/mnt/sdcard/boot/cmdline.txt
Create config.txt with something like:
cat </mnt/sdcard/boot/config.txt

disable_overscan=1

hdmi_force_hotplug=1

hdmi_group=1

hdmi_mode=16

HERE
The above settings force full HD over HDMI with no overscan, even if you boot while the monitor is off or disconnected. Adjust as needed per the Raspberry PI docs, or pull the config.txt from your existing Pi setup.
Install rpi-update with:
wget -O /mnt/sdcard/usr/bin/rpi-update https://raw.githubusercontent.com/Hexxeh/rpi-update/master/rpi-update

chmod +x /mnt/sdcard/usr/bin/rpi-update
Adjust the root password by copying from an existing /etc/shadow file to /mnt/sdcard/etc/shadow. The password is the long string between the 1st and 2nd : characters, or set it using the following commands:
read -s -p "Enter password: " pass

echo -n root:$pass | chpasswd -c SHA512 -R /mnt/sdcard
Finish up this phase of the install with:
umount /mnt/sdcard/boot

umount /mnt/sdcard

sync
Install the SD card in your Pi2 and boot.
At this point, your Pi2 pi might come up to the Fedora first boot screen but the mouse and keyboard don’t work. The problem will probably be resolved by running rpi-update.
Get the DHCP address from your router or DHCP server and ssh into the Pi2 as root. (if you’re doing all this from your Pi2 like I did, you can reasonably guess that the address won’t change.) In my case, this was the only “desktop” I had so I used ConnectBot from my phone.
Install binutils so that rpi-update can run:
dnf install binutils
Update your Fedora install and Pi2 firmware with:
dnf update

rpi-update
Reboot with the new firmware and the mouse/keyboard should work:
init 6
Complete the Fedora firstboot menus.
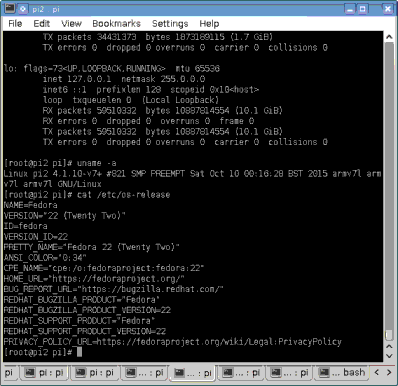
At this point, you have a basic functioning Fedora desktop.
If sound is not working in 23, try this:
cat </etc/modules-load.d/snd_bcm2835.conf

#load Raspberry Pi sound module

snd_bcm2835

HERE

modprobe snd_bcm2835
See my next post about what to do after install to make a more complete desktop Fedora system with multimedia.
